Hi,
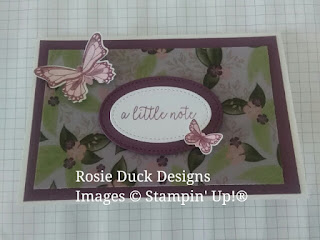
Earlier this week I uploaded a You Tube Tutorial sharing how I made the above card.
Here is the video:-
The card was made using the Butterfly Gala Stamp Set & coordinating Punch.
With this Card I took the opportunity to feature two of my favourite retiring Products, the 2017-19
In Color Fresh Fig & the gorgeous Floral Romance Speciality Designer Series Paper.
However, I thought it important to feature a version of the card using Products that are carrying through to the new Catalogue, so I shared this Card towards the end of the Video:-
Not wishing to make the video too long I said I would share the measurements & instructions on a Blog Post, so here goes:-
To make this card you will need:-
1 piece of Grapefruit Grove Card 8"x 6" scored at 4" on the long side, once folded this is your Base Card.
2 pieces of Whisper White Card 3 3/4" x 5 3/4"
1 piece of Grapefruit Grove Card 3 1/4" x 5 1/4"
You will also need a piece of Grapefruit Grove Card 3" x 3 3/4" plus
a piece of Whisper White Card large enough to stamp your chosen Butterfly Stamp & to Die Cut a Stitched oval out that measures approx 2 3/4" x 2".
THE CARD IS IN THE PORTRAIT STYLE
INSIDE THE CARD
Add a small Butterfly Design to the Top Left Corner & Bottom Right Hand Corner of one piece of the 3 3/4" x 5 3/4" Whisper White Card & attach to the inside of the card using your chosen adhesive.
FRONT OF THE CARD
Attach the other piece of 3 3/4" x 5 3/4" Whisper White Card to the Front using your chosen adhesive, centralising it to leave a small border.
Place the piece of Grapefruit Grove Card 3 1/4" x 5 1/4" into the Layered Leaves 3D Embossing Folder & run it through your Big Shot.
Attach to the Card Front using your chosen adhesive, centralising it to leave a border.
Choose the Butterfly Stamp that you want to use & stamp it on to a piece of Whisper White Card using Grapefruit Grove Ink. Using a Blender Pen in conjunction with the Ink Pad, colour the areas of the Butterflies that you want to. As this is a light Ink the Wink of Stella may not blend the ink as it did the Fresh Fig in the video. I just dabbed the brush of the Wink of Stella in the corner of my Ink Pad (where it won't impact on future stamping) to pick up some ink & then brushed the Wink of Stella over the 2 Butterflies.
Once dry Punch out the Butterflies using the Punch.
Using the Stitched Shaped Framelits Dies take the largest of the Ovals & run that through your Big Shot using the additional piece of Grapefruit Grove Card.
On the additional piece of Whisper White Card, stamp the Thank You So Very Much Sentiment using Grapefruit Grove ink & then place the third largest Oval from the Stitched Shaped Framelits over it & run it through your Big Shot.
Attach the Whisper White Oval with the Sentiment to the larger Grapefruit Grove Oval & attach to the centre of the Card using Stampin' Dimensionals.
Attach the larger of the Butterflies to your Card using a Mini Stampin' Dimensional & the small one using a Glue Dot.
Your Card is finished.
Add a stamped Butterfly to the Envelope as a finishing touch.
Until next time
Take care
Anne x
Rosie Duck Designs
Just a thought, if you would like to ensure that you keep up to date with my Blog, just hit the
SUBSCRIBE BUTTON. You will then be advised when a new Post has been uploaded
DISCLAIMER
All images obtained from Stampin' Up!® are the copyright of Stampin' Up!®
All artwork unless stated otherwise is created by Anne Rothwell.
Cards & other items are for your inspiration & personal use only.
All content on this Blog is the sole responsibility of Anne Rothwell, Independent Stampin' Up! Demonstrator.Services, Classes, Projects, Videos (unless produced by Stampin' Up!® are not endorsed by Stampin' Up!®


Comments
Post a Comment